Menu
Move Data from SQL Server to Azure Blob Storage with Incremental Changes – Part 2
By Ginger Daniel | Azure
By Ginger Daniel | Azure
In Part 1 of this series, we demonstrated how to copy a full SQL database table from a SQL Server database into an Azure Blob Storage account as a csv file. My client needed data moved from their on premise SQL Server database to Azure, and then needed the daily incremental data changes uploaded as well. This article will discuss how to upload the incremental data changes to Azure after the initial data load.
The general steps for uploading incremental changes in a table are:
Enable Change Tracking
Change tracking uses a version counter that increases as changes are made to data in your table, and every row has a version number. When a request is sent to query the changes made, a function is called that supplies the version number, and then returns information about the changes since the last version. For more details about change tracking go here: https://docs.microsoft.com/en-us/sql/relational-databases/track-changes/work-with-change-tracking-sql-server?view=sql-server-2017
Utilizing change tracking on your SQL server (source) database will allow your Azure Data Factory (ADF) to get the tracked changes and apply them to the data store, which in our case will be a csv file uploaded to Azure Blob Storage.
Run the following to enable change tracking on both your database and table. Set the retention days to whatever is appropriate for your organization.
--enable change tracking on database and table
alter database AdventureWorks2016
set change_tracking = on
(change_retention = 2 days, auto_cleanup = on)

alter table HumanResources.Department
enable change_tracking
with (track_columns_updated = on)
Enable Snapshot Isolation
Enabling snapshot isolation on your database is not required, but rather advised because there are some possible scenarios where the changed data results could be inconsistent.
You will need to determine the probability of these scenarios occurring, and determine if you want to enable snapshot isolation or not. If you want to enable it, run the statement below:
--enable database to use snapshot isolation
alter database AdventureWorks2016
set allow_snapshot_isolation on;

--example of using snapshot isolation
set transaction isolation level snapshot;
begin tran
  -- Verify that version of the previous synchronization is valid.
  -- Obtain the version to use next time.
  -- Obtain changes.
commit tran
Create Table to record Change Tracking versions
In your SQL Server database, create a new table to store the change tracking version. The CHANGETABLE function actually holds this data, but it needs to be in a table form in order to create a dataset in ADF. Run the following to create the table with a default value:
--create a table in database to hold change tracking data
use AdventureWorks2016
go
create table ChangeTrackingVersion
(   tablename varchar(255),
    sys_change_version bigint,
);
declare @sync_version bigint
set @sync_version = CHANGE_TRACKING_CURRENT_VERSION();

insert into ChangeTrackingVersion
values ('[HumanResources].[Department]', @sync_version)
Create a Stored Procedure to Update Change Tracking Table
In your SQL Server database, create the following stored procedure to update the change tracking table. The ADF pipeline we will create later will invoke this stored procedure to update the change tracking version.
use [AdventureWorks2016]
go
create procedure [dbo].[Update_ChangeTrackingVersion]
@CurrentChangeTrackingVersion bigint,
@TableName varchar(100)
as
begin
    update ChangeTrackingVersion
    set sys_change_version = @CurrentChangeTrackingVersion
    where tablename = @TableName
end
Create Linked Services
In Part 1 of this blog, we previously created Linked Services in our Azure Data Factory to create a communication link between our SQL Server and ADF, and to link ADF to our Azure Blob Storage. We can use those same linked services to upload our incremental data, but I will outline the steps again to create the linked services.
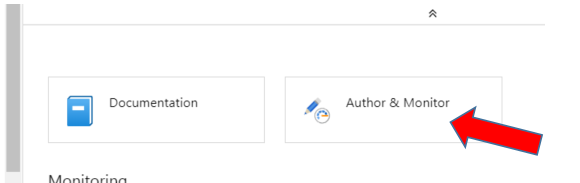
Sign in to your Azure account, and from the Home or Dashboard screen select the Azure Data Factory you created previously. In the properties screen, click on Author & Monitor to open ADF in a new browser window.
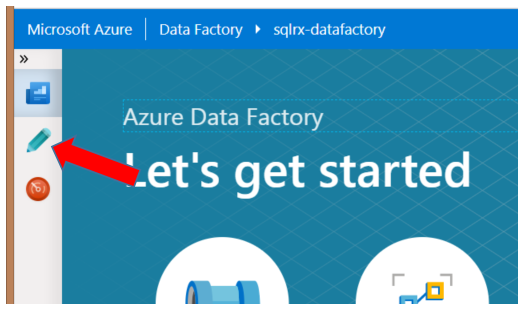
Once in the new ADF browser window, select the Author button on the left side of the screen to get started as shown below:
Create Source Linked Service (from your SQL Server)
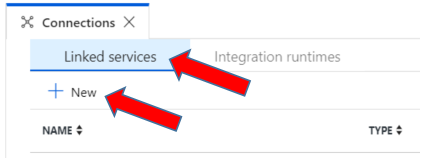
Open the Connections window located at the bottom left of the screen, click on the Linked Services tab and + New to create a new linked service.
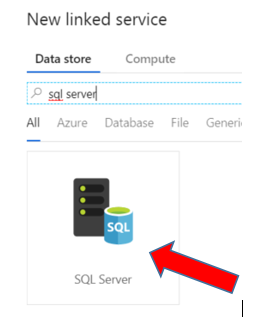
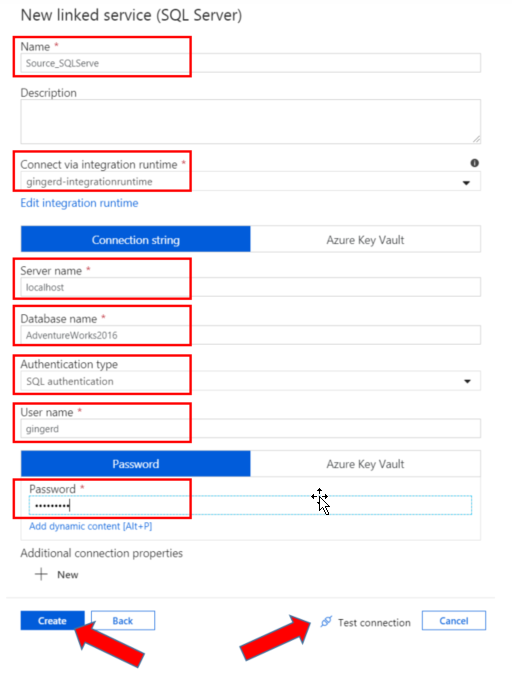
In the Search bar, search for and select SQL Server
Choose a name for your linked service, the integration runtime you have created, server name, database name, and authentication to the SQL server. I have named my linked service with a descriptive name to eliminate any later confusion. I used localhost as my server name, but you can name a specific server if desired. I also used SQL authentication, but you have the choice to use Windows authentication as well. After populating the necessary fields, push Test Connection to make sure there are no errors, and then push Create to create the linked service.
Create Sink Linked Service (to Azure Blob Storage)
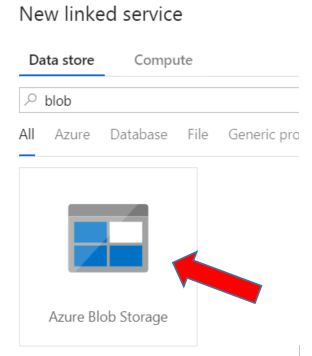
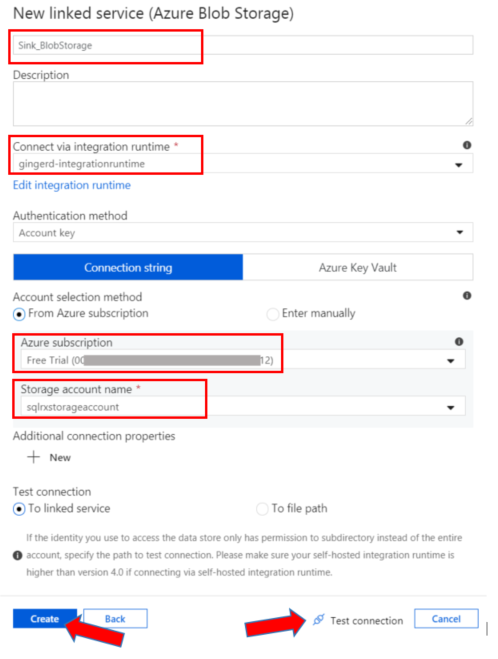
Now create another Linked Service to establish a connection between your data factory and your Azure Blob Storage. Click on the + New button and type Blob in the search bar. Select the Azure Blob Storage icon. Go through the same steps and choose a descriptive name that makes sense. I have named mine Sink_BlobStorage. Select the integration runtime service you set up earlier, select your Azure subscription account, and your Blob storage account name you previously created. Test the connection, and hit Create.
You now have both linked services created that will connect your data sources. Next step is to create your Datasets.
Create Datasets
In this step we will use three datasets in our data factory: one to represent our source data, one to represent our destination data, and one to represent the change tracking data.
Create a Source Dataset (from SQL Server)
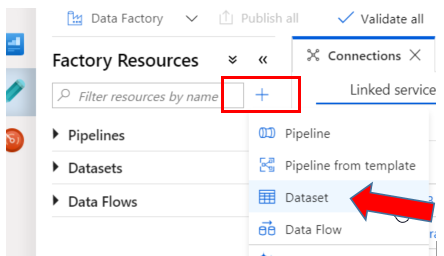
We will use the same Source dataset we created in Part 1 of this article. The steps we took to create the source dataset are recapped below: Click on the + sign on the left side of the screen and select Dataset. Search for and select SQL Server to create a dataset for your source data.
Provide a descriptive Name for the dataset and select the Source linked service you created earlier.
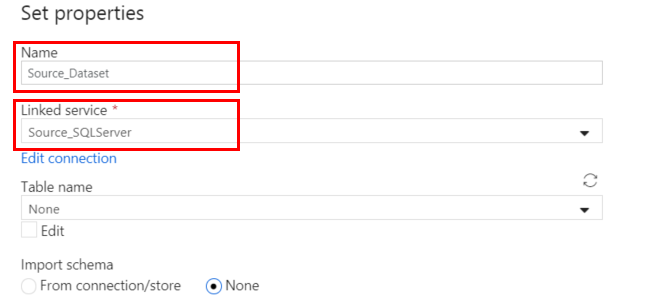
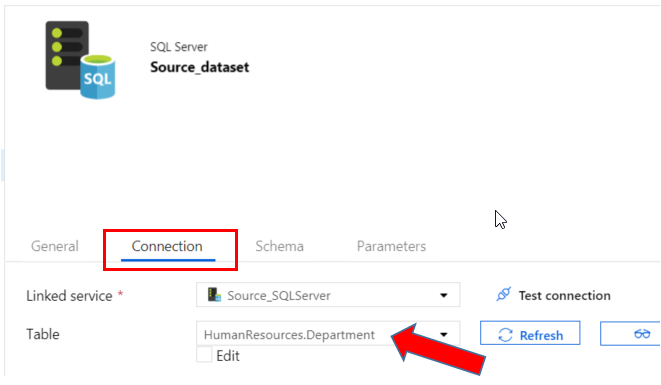
In the properties of your Source dataset, click on the Connection tab and make sure to select the table from which you will be uploading data changes
Create a Sink Dataset (to Azure Blob Storage)
Now create a dataset to represent the incremental data changes. Click on the + sign in the left pane of the screen again to create another Dataset. Search for and select Azure Blob Storage to create the dataset for your sink, or destination data. We will select the DelimitedText option to upload the incremental data as csv files.
Type in the name of your dataset, select the Sink linked service, and input the name of the Container in your storage account, as well as the Directory/subfolder. We can also dynamically generate the csv file names by using the expression
@concat(‘Incremental-‘,pipeline().RunId,’.txt’)
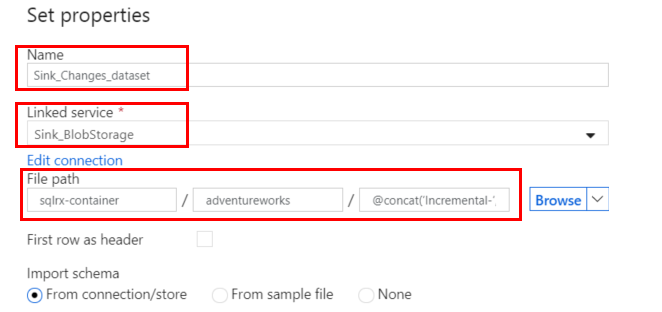
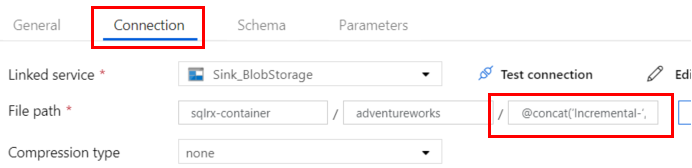
If you receive an error because of the file name, create the dataset without a file name and add it to the Connection tab of the dataset properties
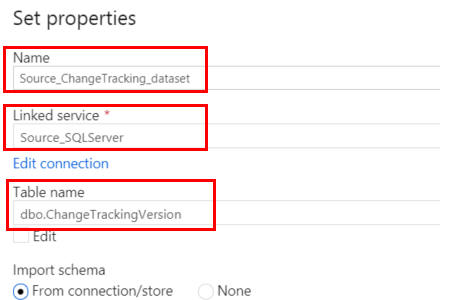
Create a Source Dataset to Represent Change Tracking Data
The third dataset will represent the change tracking version number from the ChangeTrackingVersion table you created in your SQL server database.
Click on the + sign on the left of the screen and select Dataset. Search for and select SQL Server to create a dataset for your source data. Provide a descriptive Name for the dataset and select the Source linked service you created earlier. Select the ChangeTrackingVersion table in your SQL database.
Now that we have all our data sources linked and defined, the fun part begins – creating the workflow logic that will upload our incremental data. Before we create, debug and publish our Pipeline activities, let’s first go into our SQL database table and make some changes to the data.
Make Data Changes in Database
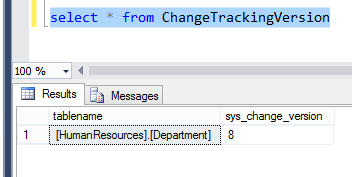
You have already enabled change tracking on your SQL database and table. And you have already created a table to record the change tracking versions. If we query the ChangeTrackingVersion table, we can see that my change version number is currently at 8. (I have made several changes while testing, so your version number may still be at zero).
If you are using the AdventureWorks database for this exercise, you can run the following script to make some insert and update data changes to the HumanResources.Department table.
--make changes to data in tables
set identity_insert HumanResources.Department on
insert into HumanResources.Department
(DepartmentID,Name,GroupName,ModifiedDate)
values
  ('19','Social Media','Sales and Marketing','2019-10-31 00:00:00.000'),
  ('20','Training and Education','Quality Assurance','2019-10-31 00:00:00.000')

update  HumanResources.Department
set ModifiedDate = '2019-10-31 00:00:00.000'
where GroupName = 'Research and Development'
Create a Pipeline
In this step we will create a Pipeline workflow that will get the old and new change version, copy the changed data between the version numbers from SQL server to Azure Blob Storage, and finally run the stored procedure to update the change version number for the next pipeline run.
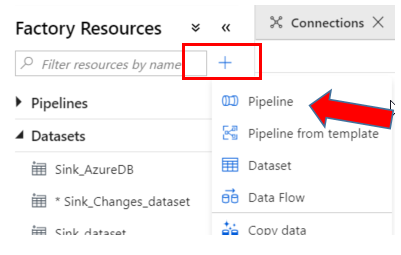
In the left pane of the screen click the + sign to add a Pipeline.
Add First Lookup Activity
The Lookup activities will get the old and new SYS_CHANGE_VERSION from SQL database function. And it will get the change tracking version used in the last copy operation that is stored in the SQL table.
Under Activities, search for Lookup, and drag the Lookup icon to the blank area in the pipeline designer surface.
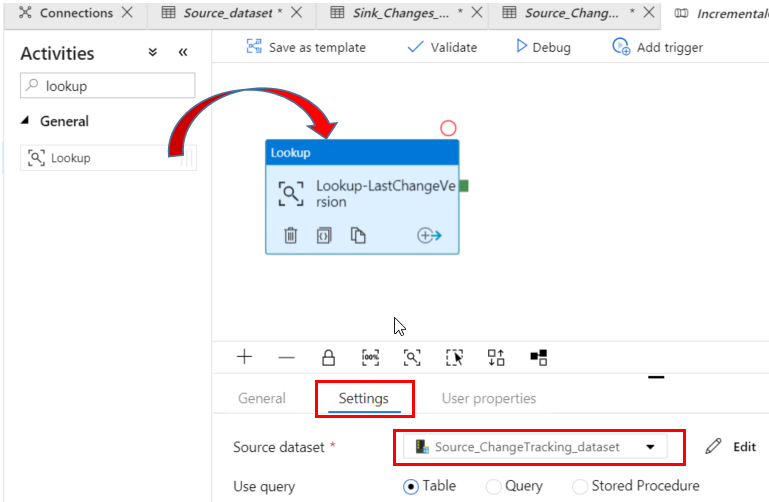
Change the name of the pipeline to IncrementalCopy-pipeline, and change the name of the lookup activity to Lookup-LastChangeVersion.
In the Settings tab of the Activity properties, select the Source change tracking dataset you created earlier.
Add Second Lookup Activity
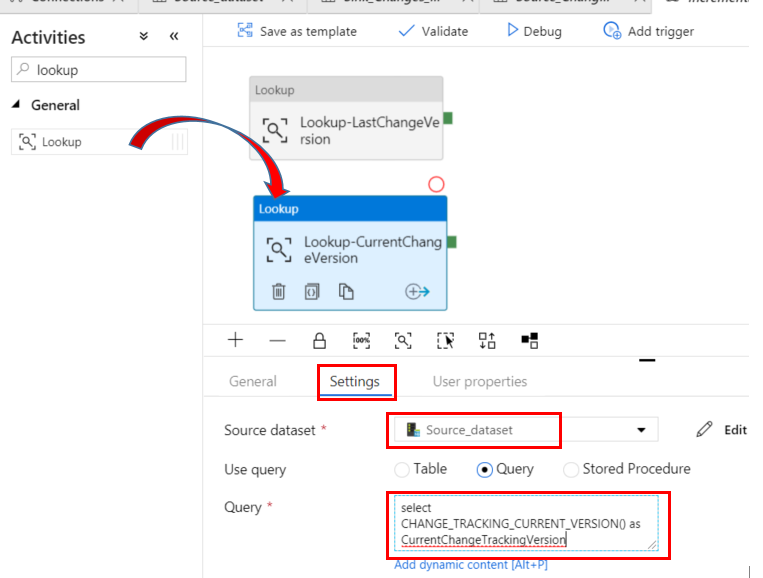
In the Activities section, drag the Lookup icon again to the pipeline designer surface underneath the existing lookup activity. Set the name of the new Lookup activity to Lookup-CurrentChangeVersion.
In the Settings tab of the activity properties, select the Source dataset and select the Query button. Type the following statement into the Query box:
select CHANGE_TRACKING_CURRENT_VERSION() as CurrentChangeTrackingVersion
Add Copy Activity
The Copy activity will get the inserted/updated/deleted data between SYS_CHANGE_VERSION values in SQL database.
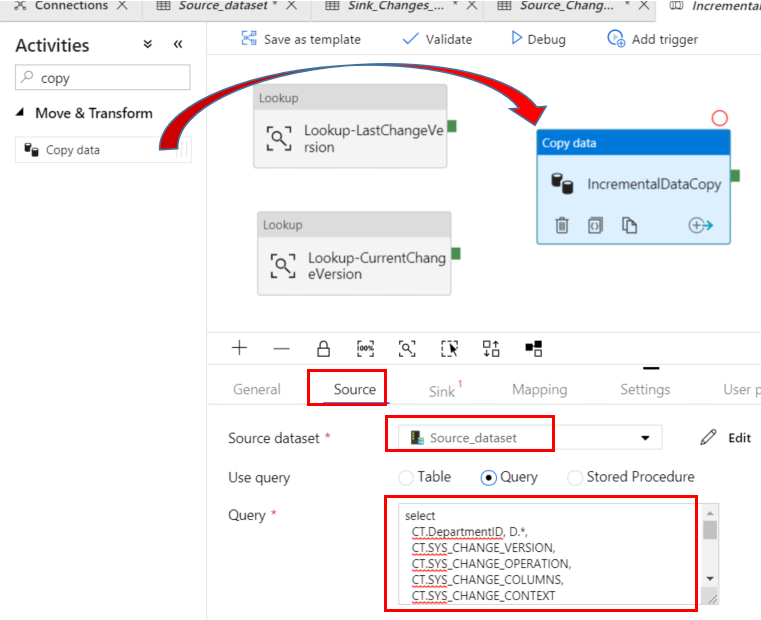
In the Activities section, search for Copy and drag the icon to the pipeline designer surface. Change the name of the activity to IncrementalDataCopy. In the Source tab of the activity properties, select the Source dataset, and select the Query button. Type the following statement into the Query box
select
  CT.DepartmentID, D.*,
  CT.SYS_CHANGE_VERSION,
  CT.SYS_CHANGE_OPERATION,
  CT.SYS_CHANGE_COLUMNS,
  CT.SYS_CHANGE_CONTEXT
from  HumanResources.Department AS D
right outer join CHANGETABLE(CHANGES HumanResources.Department, @{activity('Lookup-LastChangeVersion').output.firstRow.SYS_CHANGE_VERSION}) as CT
on  D.DepartmentID = CT.DepartmentID
where CT.SYS_CHANGE_VERSION <= @{activity('Lookup-CurrentChangeVersion').output.firstRow.CurrentChangeTrackingVersion}
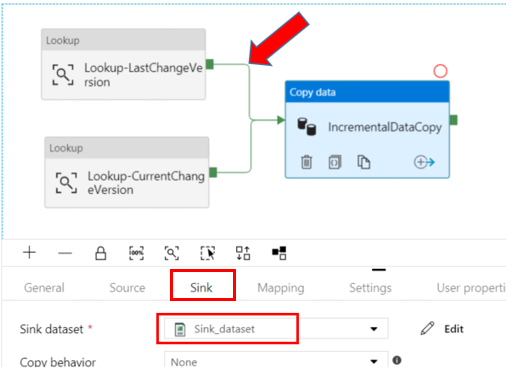
On the Sink tab of the activity properties, select the Sink dataset.
Connect both Lookup Activities to the Copy Activity by dragging the green connector attached to each.
Add Stored Procedure Activity
The Stored Procedure activity will update the value of SYS_CHANGE_VERSION in the SQL table you created for the next pipeline run.
From the Activities section, search for Stored Procedure and drag the icon to the pipeline designer surface. Change the name to sp-UpdateChangeTrackingVersion.
In the SQL Account tab of the activity properties, select the Source linked service.
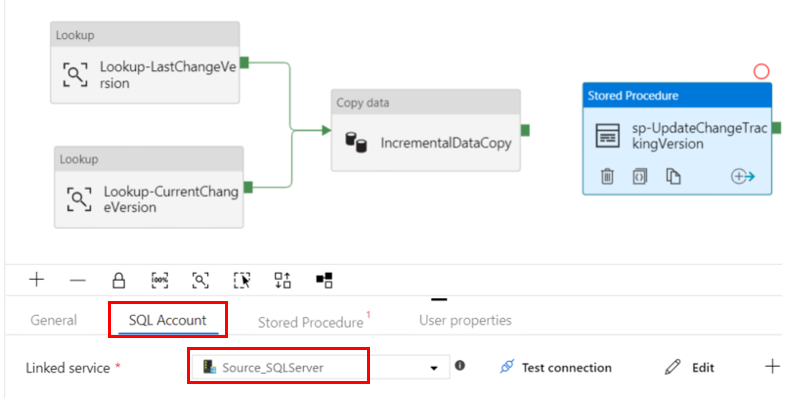
Next click on the Stored Procedure tab of the activity properties and select the Update_ChangeTrackingVersion stored procedure from the list.
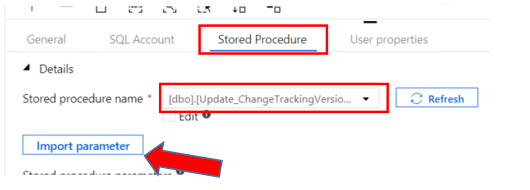
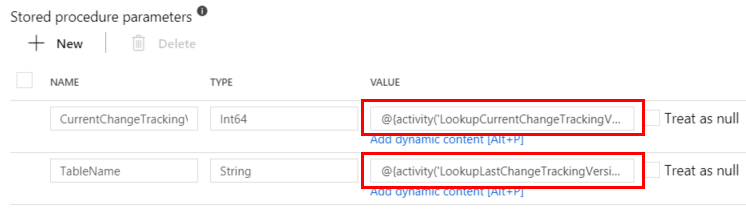
Select the Import parameter button and specify the following values for the parameters:
@{activity(‘Lookup-CurrentChangeVersion’).output.firstRow.CurrentChangeTrackingVersion}
@{activity(‘Lookup-LastChangeVersion’).output.firstRow.TableName}
Connect the Copy activity to the Stored Procedure activity by dragging the green connector.
Trigger Pipeline
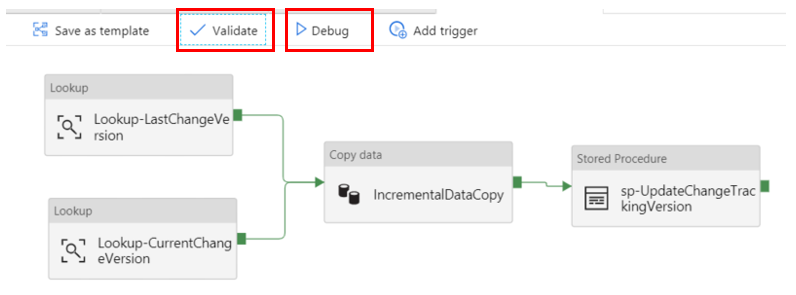
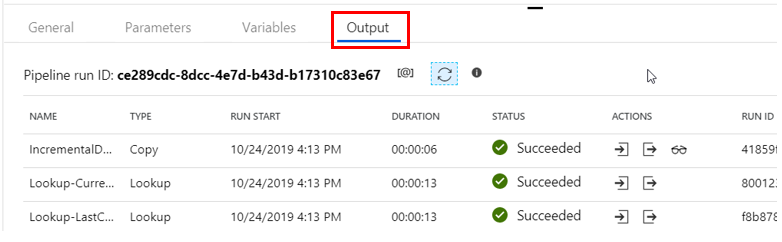
Click Validate to ensure no errors are found in the pipeline. Then hit Debug to run the pipeline. You will be able to see the progress of the workflow in the Output tab of your pipeline.
After the pipeline completes running, go to your storage account container and verify the incremental data file was uploaded to the folder.
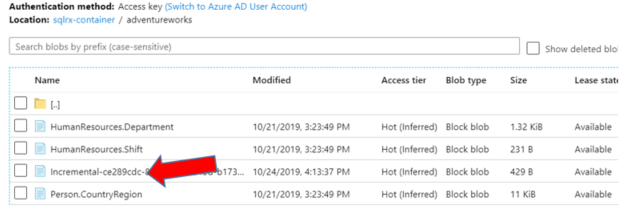
You can click on the ellipse to the far right of the data file and select view/edit to open the file. You should see a flat file of data separated by commas. At the end of each row of data you will see a “U” for rows that were updated, and an “I” for rows that were inserted.

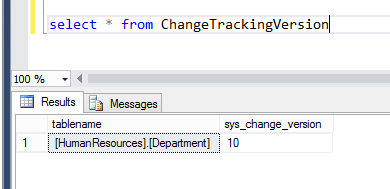
You can see from this select statement, the version number in your ChangeTrackingVersion SQL table has changed:
You can also run this statement to see the changed made and the new version number:
declare @last_synchronization_version bigint
select
	 CT.DepartmentID, D.*,
	 CT.SYS_CHANGE_VERSION,
	 CT.SYS_CHANGE_OPERATION,
	 CT.SYS_CHANGE_COLUMNS,
	 CT.SYS_CHANGE_CONTEXT
from  HumanResources.Department as D
right outer join CHANGETABLE(CHANGES HumanResources.Department, @last_synchronization_version) as CT
on  D.DepartmentID = CT.DepartmentID
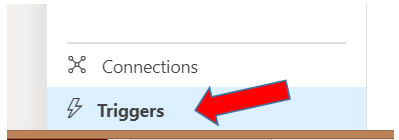
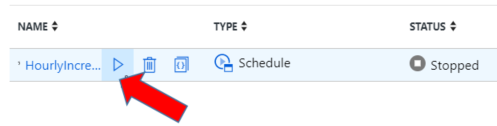
In order to schedule the pipeline to run on a regular basis, click on Triggers at the bottom left of the ADF screen
Click the + New button to create a new trigger. Give the trigger a descriptive name and choose the type of trigger, the start date, and the recurrence frequency.
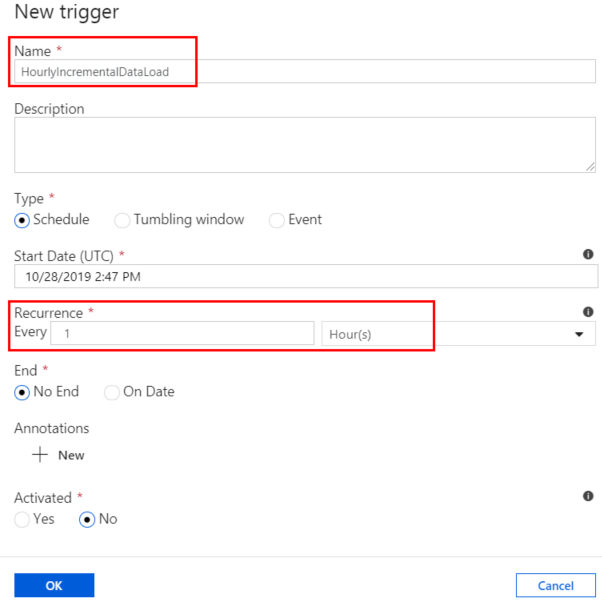
Click the Activate arrow to start and enable the trigger.
Conclusion
Part 1 of this article demonstrated how to upload full copies of SQL server tables to an Azure Blob Storage container using the Azure Data Factory service. In part 2 of the series, we looked at uploading incremental changes to that data based on change tracking information to move the delta data from SQL server to Azure Blob storage. There are multiple and different options in the overall process that can be implemented to better fit your organizational needs, but the steps above should give you a basic understanding of the process.
For more information about blog posts, concepts and definitions, further explanations, or questions you may have…please contact us at SQLRx@sqlrx.com. We will be happy to help! Leave a comment and feel free to track back to us. Visit us at www.sqlrx.com!
Session expired
Please log in again. The login page will open in a new tab. After logging in you can close it and return to this page.
[…] Ginger Daniel continues a series on moving data incrementally from SQL Server to Azure Blob Storage: […]