Menu
Repair Suspect Database – SQL Server
By Ginger Daniel | Expert
– -by Ginger Keys
Occasionally mistakes happen, things get deleted, or hardware fails. Your end users may be complaining that the application is not working or pulling up any data… or you may open SQL Management Studio and see that the database is simply unavailable. What happened!?

I have encountered a situation where an inexperienced IT employee saw that a drive was running out of space, and decided to delete the database transaction log file, thinking that it was only an activity log that wasn’t important. On the contrary, transaction log files are what keeps data in the database transactionally consistent and durable. And unfortunately, sometimes hardware failures can cause the database files to become corrupt. When your transaction log file (ldf) of your database is deleted or corrupted, it makes your database unusable.
In this article we will…
Create an Un-usable Database
It’s always a good idea to plan for and practice dealing with IT problems before they actually occur. For demonstration and practice purposes, I will show how to cause a test database to be in a SUSPECT or unusable condition. For testing and practice in your environment, make sure you are using a test database that is un-essential and on an instance that is not used for production.
1. First step is to take backup of the database
2. Next, make changes to your data. You can either manually insert, update, or delete record(s) in your database, or there are many scripts available to insert random data into a database table. Here is one link for inserting random data:
http://blog.sqlrx.com/2015/05/06/generate-random-column-values-to-populate-a-table-for-testing/
3. After making changes to your data, stop the SQL Server Service. You can do this by right clicking on your instance in SSMS, and selecting ‘Stop’
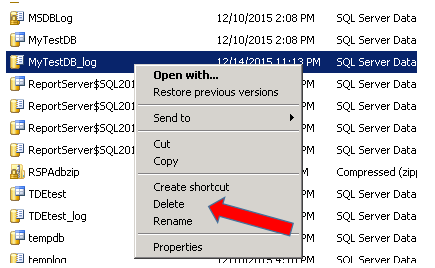
4. After the service is stopped, you can delete the log (ldf) file. Go to Windows explorer to the location where the ldf files reside, right click on your test database_log.ldf file and Delete.
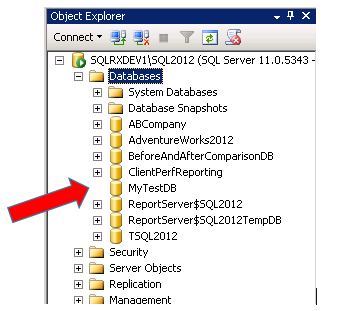
5. After deleting the ldf file, restart SQL Server Service. You will now see that your database is still in the list, but is not available.
What’s the Problem?
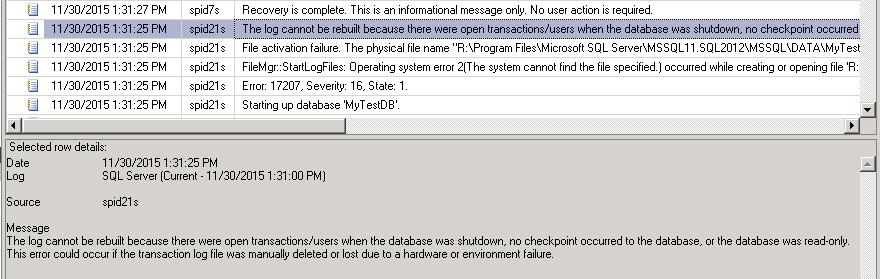
First step is to figure out what is wrong with the database. Why is it unavailable? The SQL Server Logs is a good starting point to find out what happened to the database. Looking at our logs in this example, we find that the database log file is missing:
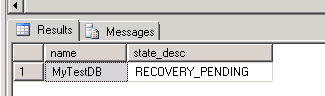
To find out what state the database is in, run the following query:
SELECT name, state_desc
FROM sys.databases
WHERE state_desc <> ‘online’
The database will either show as SUSPECT, IN_RECOVERY, or RECOVERY_PENDING.
How to Fix it!
The best solution is to restore your database from the most recent backup. However that is not always possible. Your backup files may be corrupt or inaccessible. Or you may simply not have a backup plan in place (gasp!).
If your backup files are lost or not available, your last resort option is to force SQL Server to rebuild the lost transaction log file. But this means that any changes to data since the last backup will be lost.
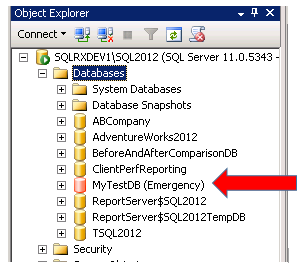
1. To rebuild the log file, first put the database into EMERGENCY mode:
USE master
GO
ALTER DATABASE MyTestDB
SET EMERGENCY
GO
2. Next, put the database into SINGLE USER mode:
ALTER DATABASE MyTestDB
SET SINGLE_USER WITH ROLLBACK IMMEDIATE
GO
3. Now try and force a transaction log to be built for the database. This can be done with either the ALTER DATABASE REBUILD command, or the DBCC CHECKDB REPAIR_ALLOW_DATA_LOSS command.
To use the ALTER DATABASE REBUILD command, get the name of the log file and its location:
SELECT d.name AS dbname, m.name AS logicalname, m.physical_name
FROM sys.master_files m
JOIN sys.databases d ON (d.database_id = m.database_id)
WHERE m.type = 1 – – Log
ORDER BY 1, 2

Then execute the ALTER DATABASE REBUILD command with the correct file name and location:
ALTER DATABASE [MyTestDB] REBUILD LOG ON
(NAME= MyTestDB_log, FILENAME=‘R:\Program Files\Microsoft SQL Server\MSSQL11.SQL2012\MSSQL\DATA\MyTestDB_log.ldf’) – -substitute the location of your log file here
GO
If you prefer not to use the ALTER DATABASE command, using the DBCC CHECKDB REPAIR_ALLOW_DATA_LOSS command will also rebuild your log file (with the same result – data loss).
DBCC CHECKDB (MyTestDB, REPAIR_ALLOW_DATA_LOSS)
GO
4. Finally, run this command to set the database back to MULTI USER mode:
ALTER DATABASE MyTestDB
SET MULTI_USER
GO
Conclusion
Once you have rebuilt your log file using either the ALTER DATABASE REBUILD option, or the DBCC CHECKDB REPAIR_ALLOW_DATA_LOSS option, there is no way to go back. All the changes made to the data since the last backup were lost when the log file got deleted or corrupted, and there is no way to recover those transactions. This is because for some reason the database was not shut down cleanly, and all the transactions (that were in the log file) didn’t get written to disk. And if the log file gets deleted or corrupted, SQL cannot not run restart-recovery. Other reasons that a database might not shut down cleanly is because of power failure, hardware failure, corruption, insufficient disk space, or insufficient memory.
It is extremely important to not only have a reliable (and tested) backup/recovery plan in place, but also to know what amount of data loss is acceptable for your organization. This will help you determine your recovery mode and tlog backup frequency for each of your databases.
For more information about blog posts, concepts and definitions, further explanations, or questions you may have…please contact us at SQLRx@sqlrx.com. We will be happy to help! Leave a comment and feel free to track back to us. Visit us at www.sqlrx.com!
Session expired
Please log in again. The login page will open in a new tab. After logging in you can close it and return to this page.
[…] Source: Repair Suspect Database – SQL Server […]