After you make sure you have everything in your environment ready to go and all the prerequisites that need to be done before deployment have been done, we are ready to install the AlwaysOn Availability Group!
The following steps need to be performed in this order:
1. Add Windows Failover Clustering:
On each replica, open Server Manager > click Add Roles & Features > select Add Failover Clustering > click Install
Proceed through the wizard, and when you get to the Select Features page, select the Failover Clustering checkbox.
And if you don’t already have .NET Framework 3.5.1 or greater installed on your server, select that checkbox as well to install. (If you do need to install the .NET Framework, you will need to reboot the machine after installing).
Proceed next through the wizard and click Install to finish the wizard. You will need to do this on every replica in your AlwaysOn group. 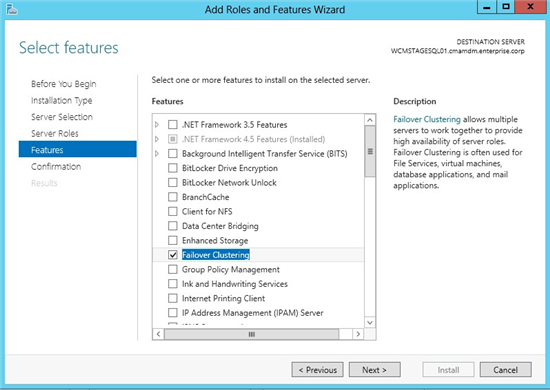 2. Configure Windows Failover Cluster (WSFC)
On your primary replica, open the Server Manager console > open Failover Cluster Manager
Click on Validate Configuration.
Add the names of all the SQL Servers you want to configure as replicas in your AlwaysOn group. 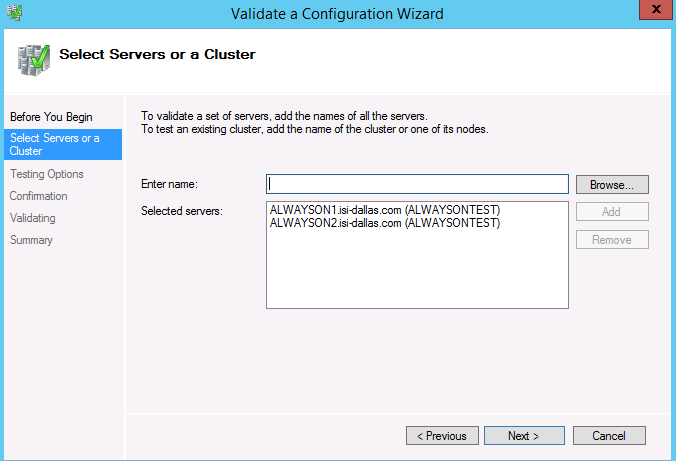
On the Testing Options page, click Run all tests (recommended). It is normal to see some warning messages, especially if you decide to use shared storage.
After the validation and summary is complete, the Create Cluster Wizard will open.
In the Access Point for Administering the Cluster dialog box, enter the virtual cluster name (not the server or instance name), and the virtual IP address of your cluster.
Proceed next through the wizard, and your cluster will be created. The secondary nodes will be added to the cluster, and your cluster should now show up on all replicas (through Failover Cluster Manager). You don’t have to go through these steps on the other replicas…you’re all done with setting up the cluster.
3. Configure SQL Server
Assuming you have already installed SQL Server 2012 or 2014 Enterprise edition on all of your replicas, and have installed it as stand-alone instances, we are ready to configure SQL Server. On each of your replicas, open SQL Server Configuration Manager.
Expand the SQL Server Network Configuration node, and click on Protocols for MSSQLSERVER. You will see in the right panel of the dialog box the TCP/IP entry. Right click on the TCP/IP entry and select Enable. 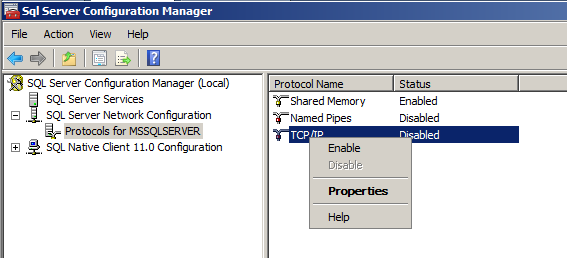
While you are still in SQL Server Configuration Manager, right click on SQL Server Services to open the Properties dialog box. Navigate to the AlwaysOn High Availability tab, and select Enable AlwaysOn Availability Groups checkbox. 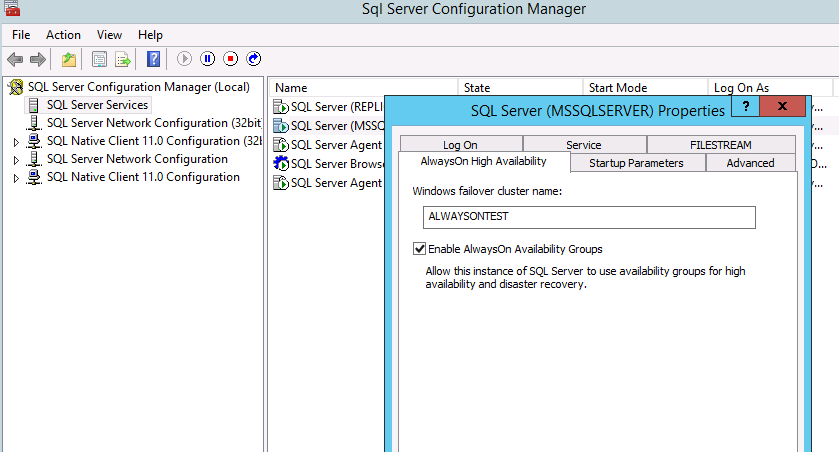
Restart the SQL Server Service after making these changes.
Do these steps on all of your replicas.
4. Configure Logins and Replicas
If it isn’t there already, add your SQL Service account (which should be a domain account – not the local machine service account) as a SQL login through SQL Management Studio (SSMS).
Add your SQL Service account to the Administrators group on each replica (via Computer Management)
Give connect permissions to the SQL Service account through SSMS: Right click on the SQL Service login to open the Properties dialog box. Navigate to the Securables page, and make sure the Connect SQL Grant box is checked. You will do this on every replica. 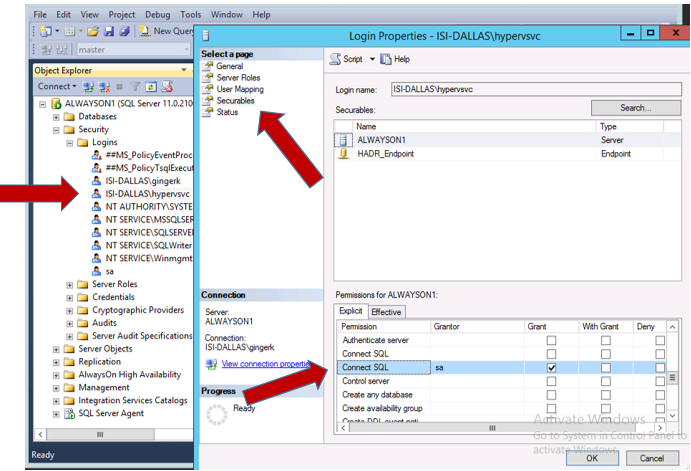
Make sure all your replicas Allow Remote Connections. You can do this through SSMS in the instance Properties, or by using sp_configure.
EXEC sp_configure ‘remote access’, 1;
GO
RECONFIGURE;
GO
Make any necessary adjustments to your Windows Firewall, to allow the replicas to communicate with each other.
Create a File Share (through Server Manager) that your SQL Service account and all your replicas can access with read/write permissions. This file share will be used for the initial backup/restore process that happens when your databases are joined to the AlwaysOn group during setup. There are other options to join your databases to the AlwaysOn group, if you prefer not to create this temporary File Share. In fact, if your databases are large I would recommend using one of the other options, in which you would restore the databases yourself on all of the secondary replicas, instead of having the wizard do this step. We’ll look at that step in a minute…
5. Install the AlwaysOn Availability Group
Make sure full backups have been run on each database.
Make sure all databases are in Full Recovery mode.
Remove these databases from any tlog backup maintenance during the installation of AlwaysOn (you can add them back later). You don’t want tlog backups happening on these databases while the AlwaysOn group is being created.
On your primary replica, open SQL Management Studio (SSMS) and expand the AlwaysOn High Availability folder. Right click on Availability Groups and select New Availability Group Wizard… to open the wizard: 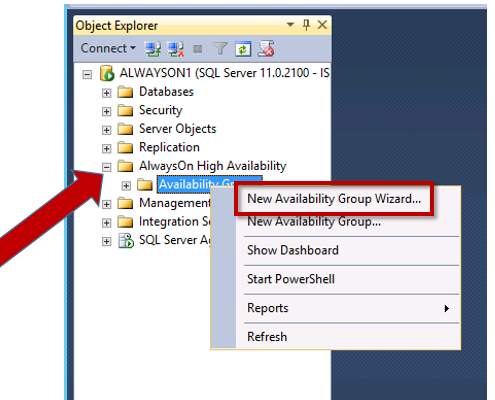
First, you will specify your AlwaysOn group name. Name it something descriptive and unambiguous: 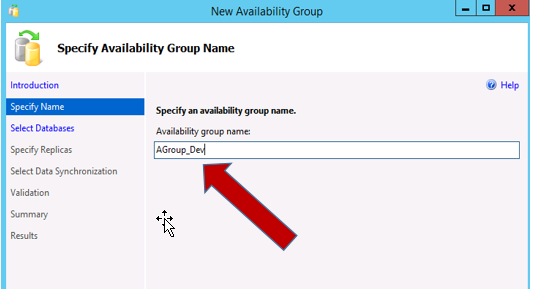
Next, you will select the databases you want to include in your AlwaysOn group. All of the databases in your instance will show up in this list…you don’t have to include all of them in your group… select only the ones to be included in the AlwaysOn group. 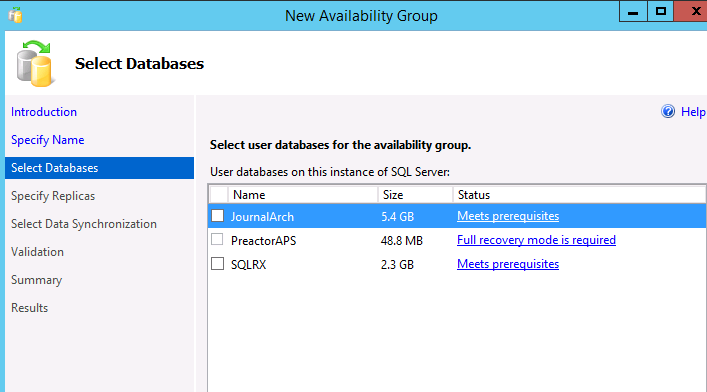
Also, next to each database is a blue link that signifies whether your database is ready to be included into your group or not. If the link does not say ‘Meets prerequisites’, then you can click on the link to get a more in-depth explanation of what you need to do. 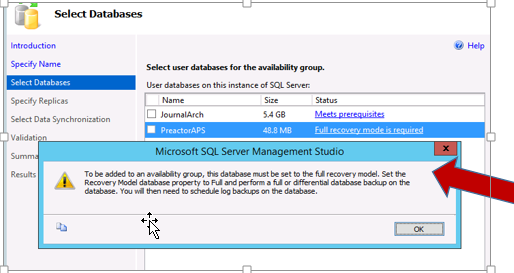
Correct any discrepancies, and then select the databases to include in the AlwaysOn group: 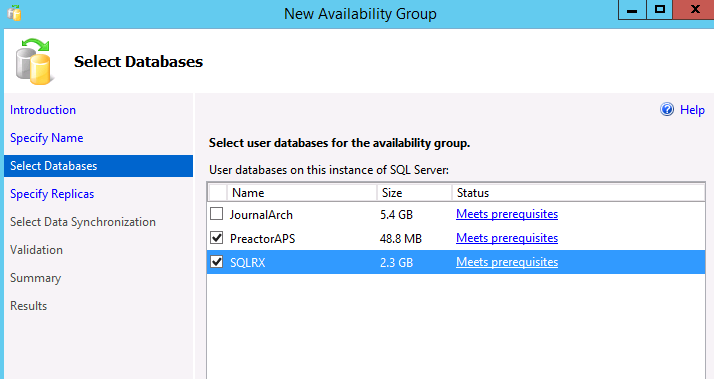
Next, is the Specify Replicas page where you will add the replicas to be included in your AlwaysOn group. Add and connect the replicas by clicking the Add Replica… button.
For each replica, you will need to specify whether you want Automatic or Manual Failover, Synchronous or Asynchronous Data Replication, and what type of Connections you will allow your end users to connect with. 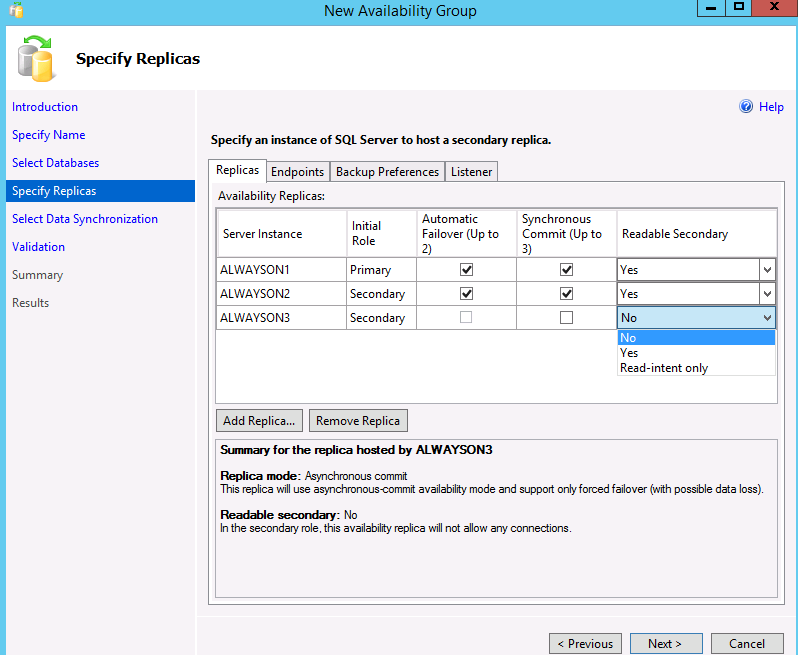
On this Specify Replicas page, there are several tabs at the top. The second tab is the Endpoints tab. On this tab verify that the port number is 5022. If you have more than one instance on your server, you might need to create another endpoint. Click here for further explanation: http://blogs.msdn.com/b/alwaysonpro/archive/2013/12/09/trouble-shoot-error.aspx 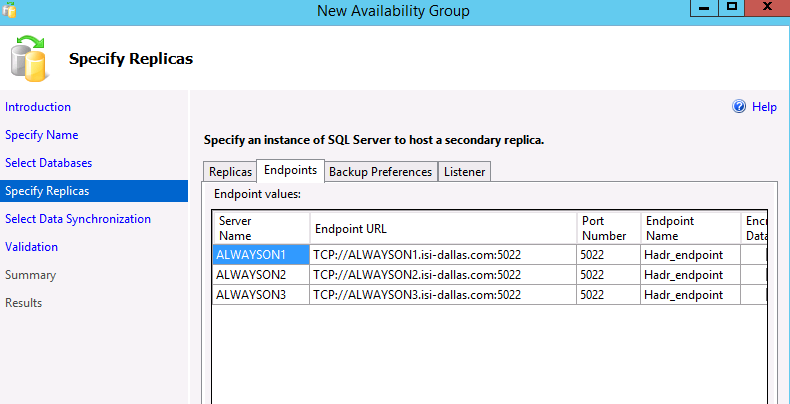
Next tab is the Backup Preferences tab. This is where you will choose where you want your backups to occur, and how you prioritize which replica will run your backups. 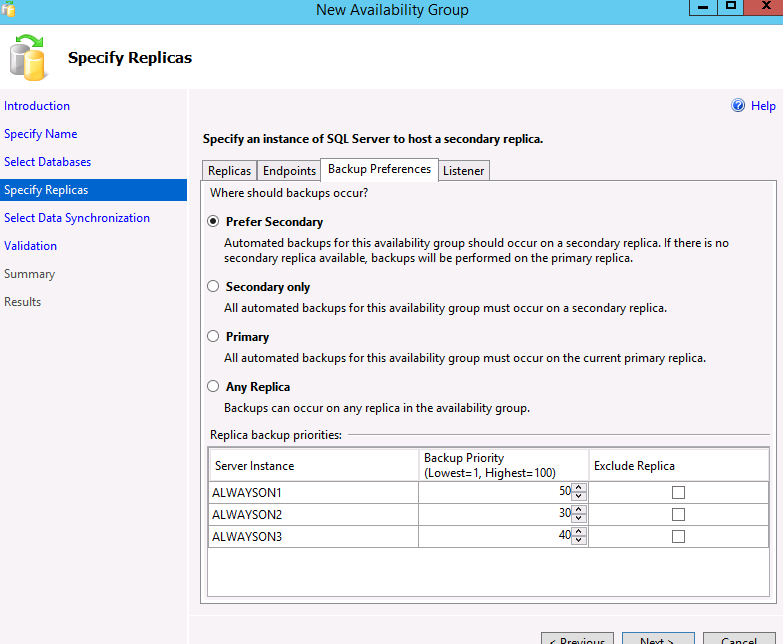
The last tab in the page is the Listener tab. Here you will select the Create an availability group listener button.
Enter the DNS name, which is the name that will be used in your application connection string.
Enter port number 1433.
And enter the IP address for your listener. This should be an unused IP address on your network. 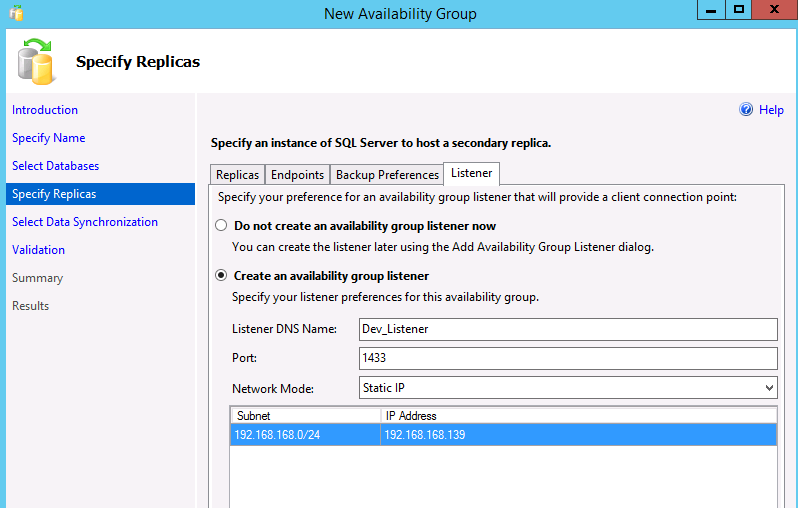
Next page in the wizard is the Select Initial Data Synchronization page. Here is where you will join your databases to the AlwaysOn group. The Full option is the Microsoft default option, and is the one that uses the File Share. The other two options (Join and Skip) are fine too, especially if you have large databases. With these other two options, you will restore the databases yourself, to each secondary replica. But this example uses the Full option, so you will browse to and select the File Share created earlier. And remember the SQL Service account and all replicas must have read/write permission to the File Share. 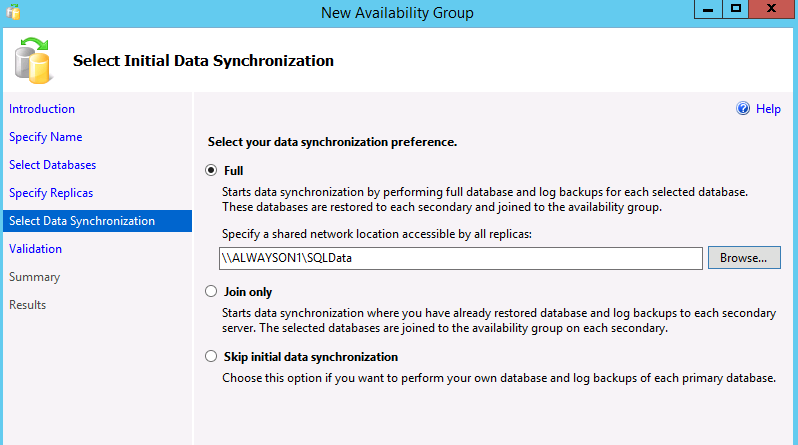
Next, ensure that your Validation checks return successful results. If you get any errors, you need to stop and correct these before proceeding. 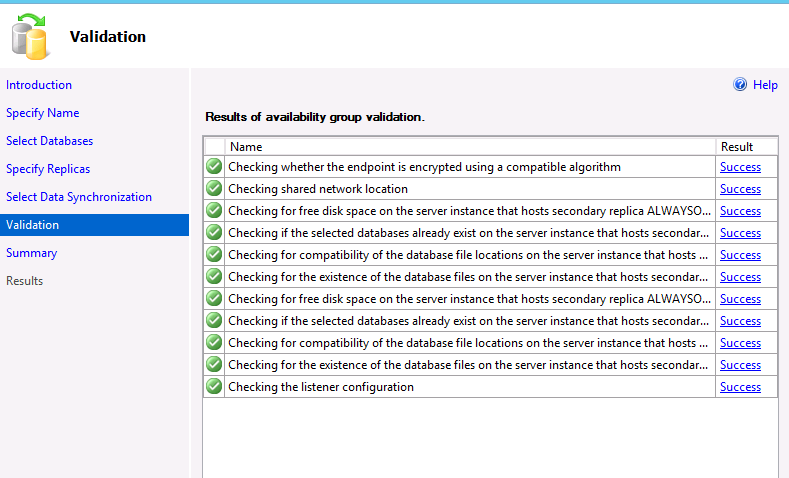
In the Summary page, verify that all your configuration settings are correct, and click Finish.
The Results page will show the progress of the installation. Verify that all tasks have completed successfully. Because there was no quorum set up while creating the WSFC earlier, we are seeing a warning message here….this will not cause the installation to fail. 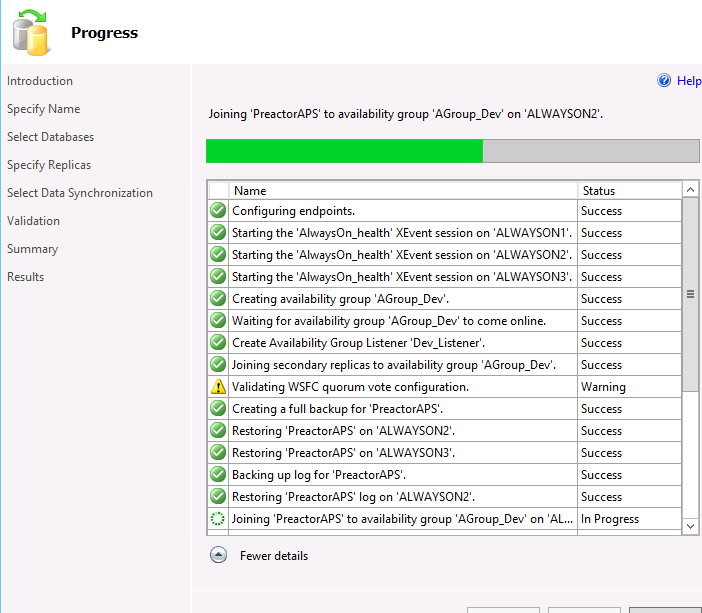
After the results are complete, and everything has finished successfully, you can now see the AlwaysOn Availability Group created in SSMS:
The Availability Group Name: AGroup_Dev
All the Replicas, and whether they are primary or secondary
All the Databases included in the AlwaysOn group
And the Listener created for the group.
This AlwaysOn Group will also be visible on all of the replicas as well.
For more information about AlwaysOn Availability Groups, concepts, definitions, further explanations, or questions you may have…please contact us at SQLRxSupport@sqlrx.com. We will be happy to help!
Session expired
Please log in again. The login page will open in a new tab. After logging in you can close it and return to this page.
[…] Steps for Installing AlwaysOn: https://sqlrx.wordpress.com/2015/04/30/steps-for-installing-sql-server-alwayson-availability-groups/ […]
Is automatic fail over works without configuring quorum?
bhu, yes it works without configuring a quorum
Superb……….
Please will you identify the version of SQL for this configuration 2016, 2017 or 2019. Thanks
There’s no option for automatic seeding in the screenshots, so this is pre-2016. On a guess, 2012.
Very useful…
Lovely doc – thanks for writing it!
Nice document… Very much useful.
It’s a horrific practice to grant elevated rights to the SQL service account (e.g: local administrator). You do not need to do this, and absolutely should not. You can add explicit rights with local security policy.
Nice article otherwise.
Thanks John and Team
This is much helpful, could you please let me know more about how to setup the Windows Failover Clustering (WSFC) on Windows 2019 Standard Edition , i have Two DB servers DB01 and DB02 in which i would like to do the Always ON setup and am new to this setup. Thanks in Advance.
Thanks for the Helpful Article mate, appreciate if you kindly answer some basic questions as well,
1) Can we setup failover clustering on Windows Server 2016 on Standard edition or it needs an enterprise edition ?
2) AlwaysOn Availability groups can be achieved even on MSSQL standard edition but can you highlight what benefits we can achieve with MSSQL Enterprise edition for Availability groups ?
3) Once we created a DB connecting to listener name on default port 1433, we need to replicate DB to the secondary MSSQL node only first time (specially when we doing it with local MSSQL user and using a mixed mode), then it will replicate Automatically?
4) What will be the changes in implementation steps when we need to place 2 MSSQL Availability Groups Nodes to 2 different Geo locations, if you kindly add some steps into existing one it will be very much covered and perfect Article.
I followed these steps exactly for 2017 enterprise but whenever I test rebooting the primary replica it never resynchronizes with the secondary. If this can be used for DR it should be able to handle a simple reboot shouldn’t it?
I have never and ever seen like this clarification. Keep it up!!! Short, clear, and easy to read.